Building a Japanese pergola can feel overwhelming if you don't know where to start. You want something that looks calm, natural, and well-built, but you're not sure about the right materials, size, or steps to follow.
This article covers everything you need, from planning and tools to step-by-step building instructions and design tips that actually work.
Whether you're starting from scratch or redesigning an existing outdoor space, you'll walk away with a clear, confident plan to build a Japanese pergola that fits your yard, your budget, and your vision.
What Is a Japanese Pergola?
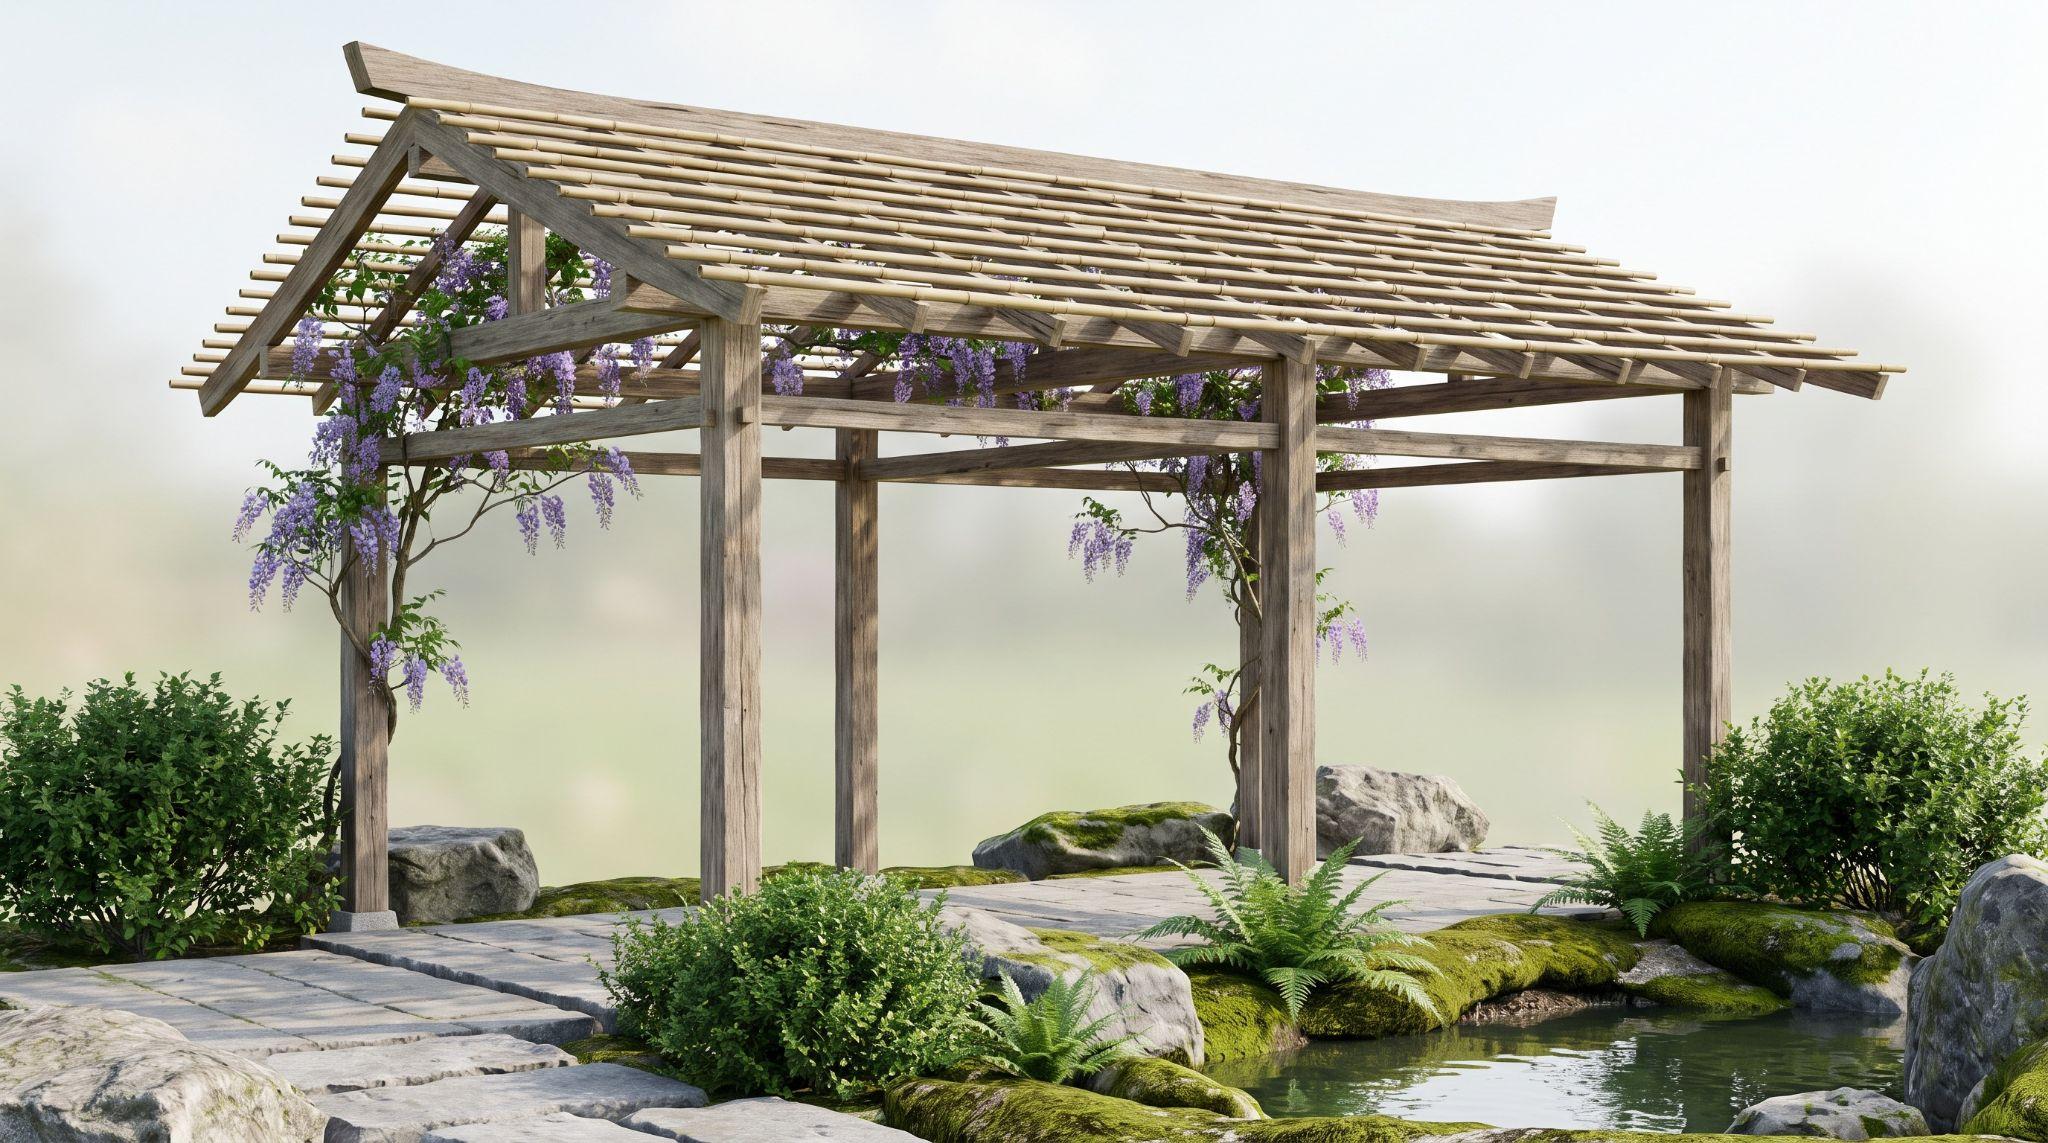
A Japanese pergola is a minimalist, open-roofed garden structure built from natural wood or bamboo, with restrained lines and subtle curved detailing. It filters light rather than blocking it, and it often supports climbing plants such as wisteria.
"Japanese" here describes a design style, not a fixed building type. That's why you'll see everything from simple hand-built frames to elaborate kits sold under the same name.It's also not a pagoda or a gazebo, and the comparison section below explains why.
The lines are clean, the materials are natural, and nothing feels overdone. It sits closer to the ground and blends into the landscape rather than standing apart from it.
Western pergolas lean toward ornate posts and decorative scrollwork, while Japanese pergolas use lighter proportions, neutral colors, and restrained detailing. They're almost always part of a larger garden plan that includes stone, water, and plants.
Traditional Japanese Design Features to Include
If you want your pergola to look authentically Japanese, focus on these features:
- Natural wood like cedar, cypress, or pine with a dark stain
- A simple post-and-beam structure with clean joints
- Low-pitched or flat roof sections with narrow spacing between rafters
- Bamboo screens or bamboo poles as accent elements
- Minimal hardware visible from the outside
The goal is to make the structure look like it grew naturally in space.
Japanese Pergola vs. Western Pergola: Key Differences
Two distinct design traditions, one shared purpose of creating shaded outdoor space.
| Aspect | Western Pergola | Japanese Pergola |
| Beam Size | Heavier, bulkier beams | Lighter, slimmer proportions |
| Decoration | Decorative scrollwork and ornate details | Simple cuts, minimal ornamentation |
| Posts | More ornate and decorative | Plain and restrained |
| Visual Goal | Make a bold visual impact | Understated elegance and restraint |
| Symmetry | Perfectly mirrored, symmetrical layouts | Intentional asymmetry for an organic feel |
| Color | Varied, often bold or painted | Neutral, natural tones |
| Primary Use | Dining and entertaining | Personal reflection and quiet nature connection |
| Cultural Origin | Western outdoor living tradition | Azumaya — traditional Japanese garden structure |
| Landscape Role | Often a standalone feature | Part of a larger plan with stone, water, and plants |
Plan Your Japanese Pergola Before You Build
Good planning saves you time, money, and frustration later.
Before you cut a single board, you need to answer some basic questions about your space and goals.
Choose the Best Location for Your Pergola
Start by walking around your yard and looking for a spot that makes sense.
The best location for a Japanese pergola usually has these qualities:
- Partial shade already exists, or you want to create it
- The ground is relatively level or can be leveled without major work
- The spot is visible from inside the house or from a seating area
- There's room to add stone paths, plants, or a water feature nearby
Avoid low-lying spots where water pools after rain. Moisture is the enemy of wood over time.
Decide on the Ideal Size and Dimensions
A common starting size for a DIY Japanese pergola is 10 feet by 12 feet. This gives you enough room for a small seating area without making the structure feel oversized for a typical yard.
Post height is usually between 7 and 9 feet. Taller posts can look out of proportion with the low, grounded style of Japanese design.
Think about how you'll use the space. A meditation spot needs less room than an outdoor dining area, and if your yard is sloped, you could also consider a raised deck with a pergola.
Sketch a Simple Pergola Plan
You don't need to be a designer to sketch a plan. A basic drawing on graph paper works fine. Mark out where your posts will go, how long your beams will run, and how many rafters you'll use.
Include the surrounding garden in your sketch. Show where paths, plants, and any water features might go. This helps you see the full picture before you start building.
Check Local Building Codes and Permit Requirements
In many areas, you need a permit to build a permanent outdoor structure. Check with your local building department before you buy materials.
Some areas have rules about how close a structure can be to property lines, fences, or overhead utilities. Knowing these rules early prevents costly changes later.
Estimate Your DIY Budget
The cost of a DIY Japanese pergola can range from around $500 to $3,000 or more, depending on size, wood type, and finishes.
Cedar and redwood cost more than pine but resist moisture and insects much better.
Make a list of every material you'll need, then price each one at your local lumber yard or hardware store. Add 10 to 15 percent to your estimate for waste and unexpected costs.
How to Build a Japanese Pergola Step by Step
Now comes the actual build. Follow these steps in order and take your time with each one. Rushing early steps causes problems later.
Materials and Tools You'll Need
- Cedar is the top choice for a Japanese pergola, offering natural rot resistance and a warm grain. Redwood works well but costs more.
- Use bamboo as accents or screens rather than structural material, especially in wet climates.
- Use pressure-treated pine for ground posts, finishing visible sections with cedar.
- Choose galvanized or stainless steel hardware to prevent rust.
- Key tools: a circular saw, power drill, level, tape measure, and post hole digger.
Once built, enhance the Japanese aesthetic with bamboo panels, stone lanterns, dark walnut or shou sugi ban stain, and climbing plants like wisteria, keeping décor minimal.
Step 1: Choose the Spot and Mark the Footprint
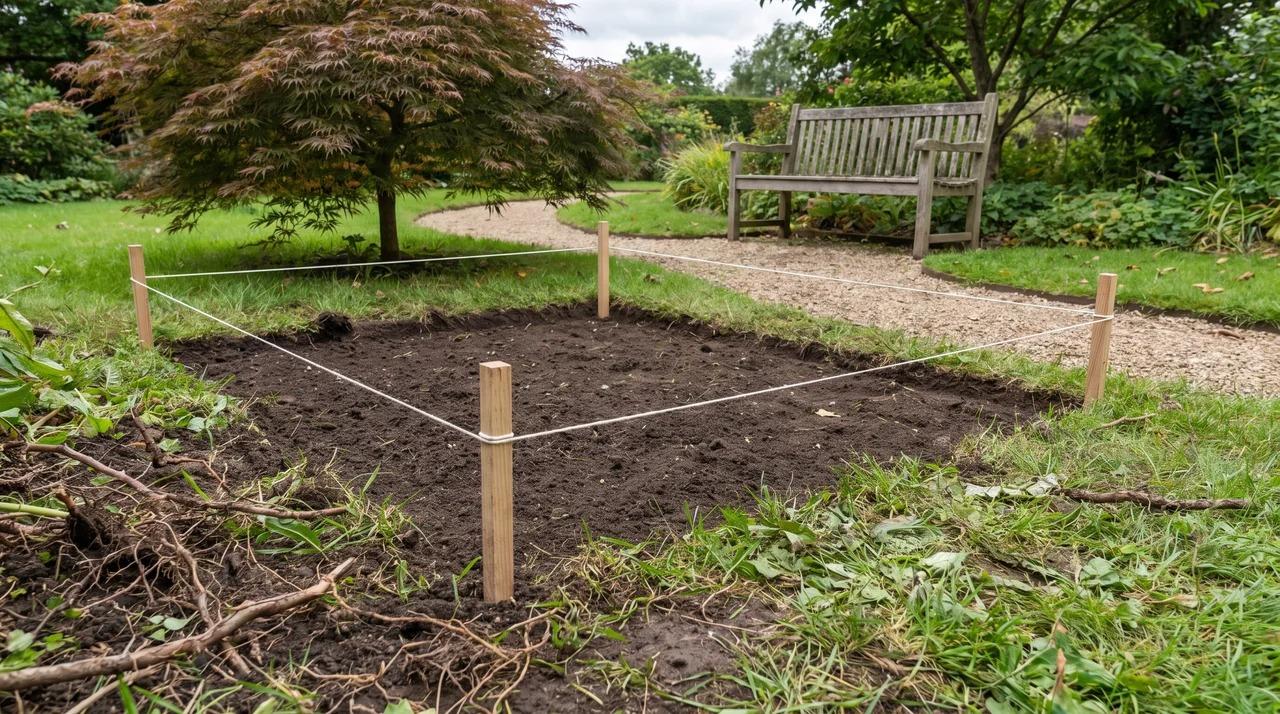
Pick a spot that frames a view, such as a path, a seat or a favorite tree, instead of the center of the yard. A slightly off-axis position feels more natural in a Japanese garden and keeps the structure from dominating the space.
Mark the corners with stakes and string. Check that the layout is square by measuring both diagonals, which should match. Clear the grass and roots, and avoid any low spot where water collects.
Step 2: Dig and Pour the Footings
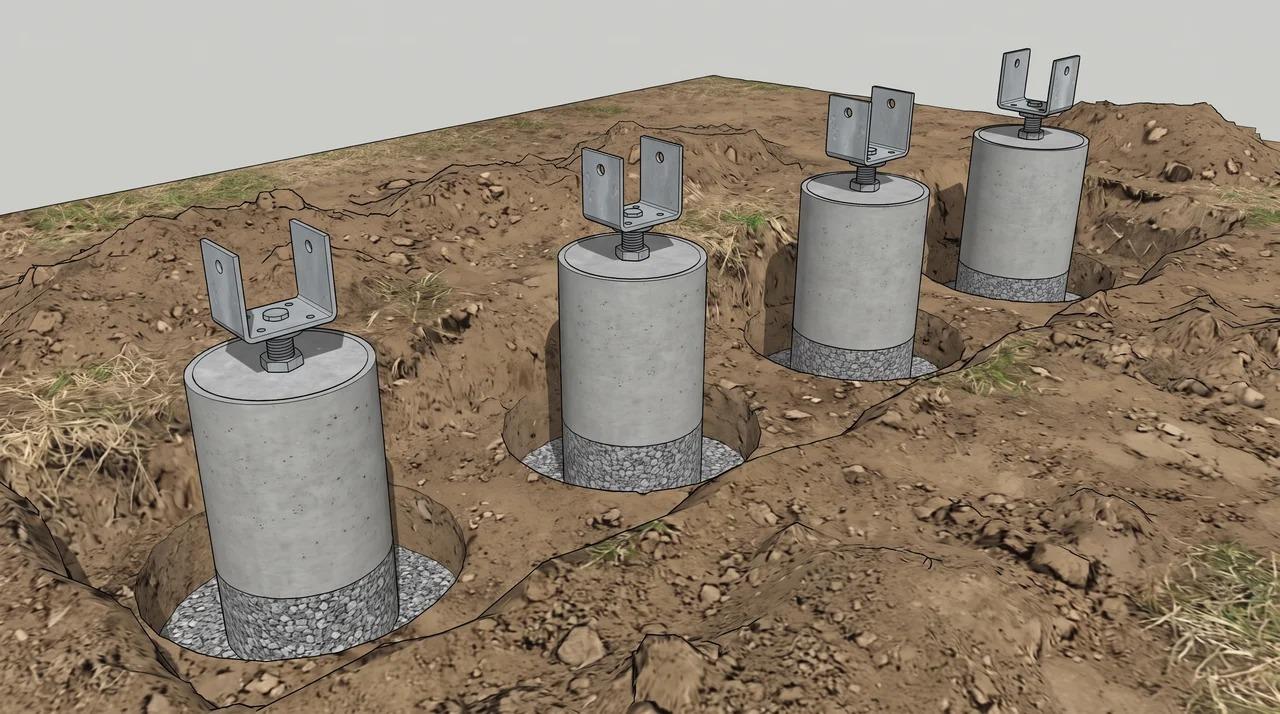
- Dig each hole at least 12 inches wide and below your local frost line. Ask your building department for the exact depth.
- Add about 6 inches of gravel to the bottom for drainage.
- Pour the concrete and set an adjustable post base into it. Use a template or string lines so all four bases line up exactly.
- Let the concrete cure for at least 48 hours before putting any load on it.
Step 3: Prepare the Wood Before Assembly
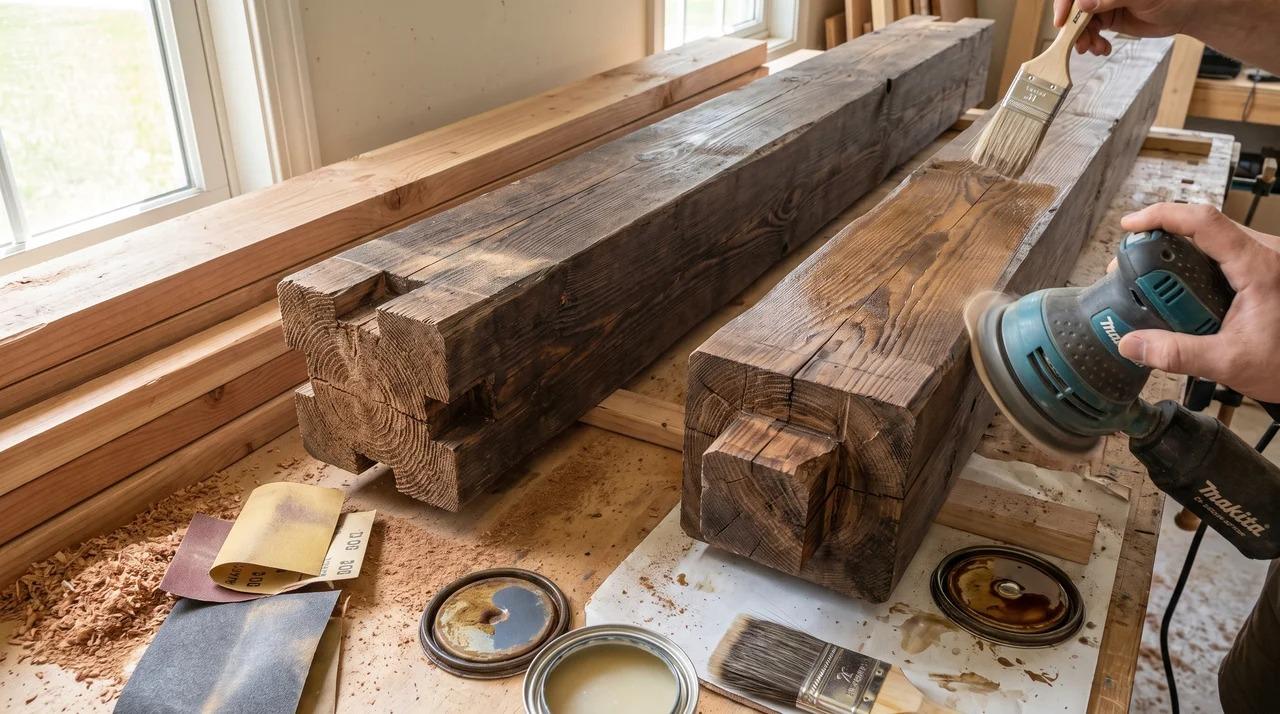
Finish the wood now, while every face is easy to reach. Assembled joints and the undersides of members are where rot starts.
- Cut all parts to length.
- Sand every surface with 120-grit paper.
- Seal or stain every face, especially the end grain and any notches.
- Choose a finish: leave the wood natural and let it weather to a soft grey, use a dark stain, or try shou sugi ban.
Shou sugi ban is a charring technique, not a stain. Char the surface with a torch in a fire-safe, open area, brush off the loose char, and seal it with exterior oil. Charring works well on cedar.
Step 4: Set and Brace the Posts
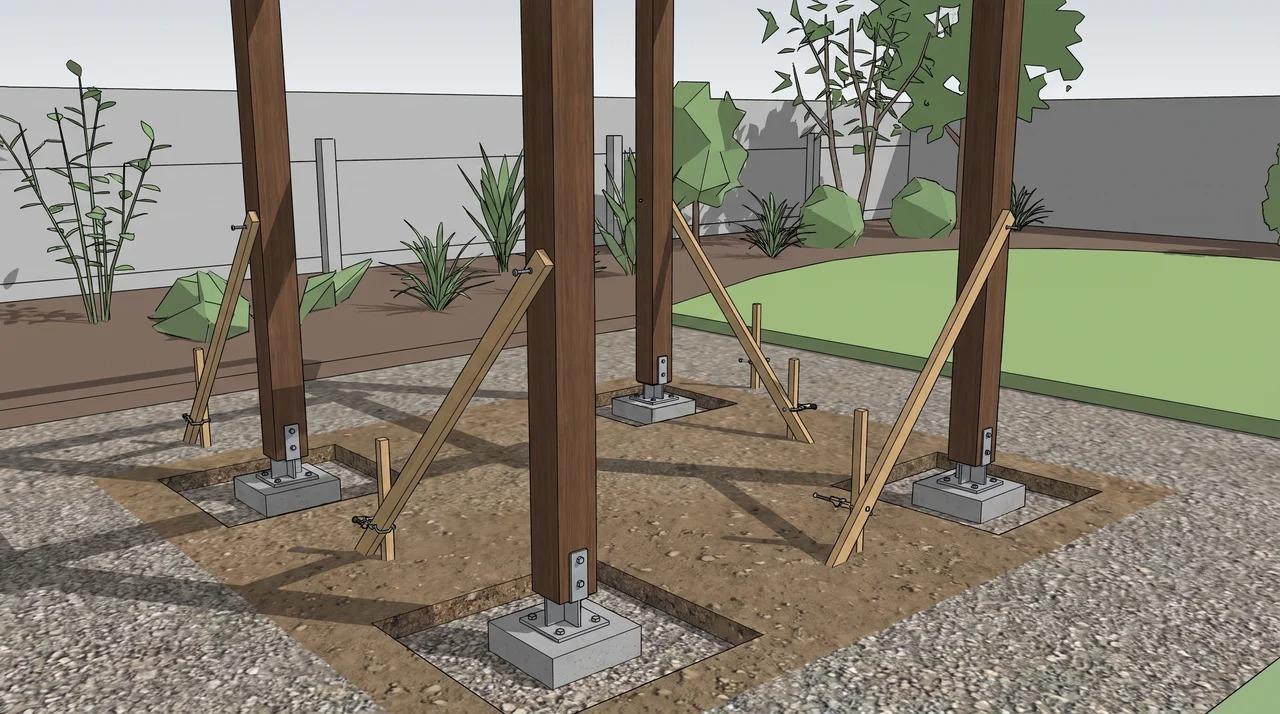
Bolt each post to its base. Check that it is plumb on two adjacent sides, then brace it with diagonal boards staked to the ground.
Don't skip this step, because a post that leans slightly will throw off the beams and rafters. Trim the posts to a matching height, keeping them between 7 and 9 feet. Tall posts look out of proportion with the low, grounded Japanese style.
Step 5: Install the Main Beams
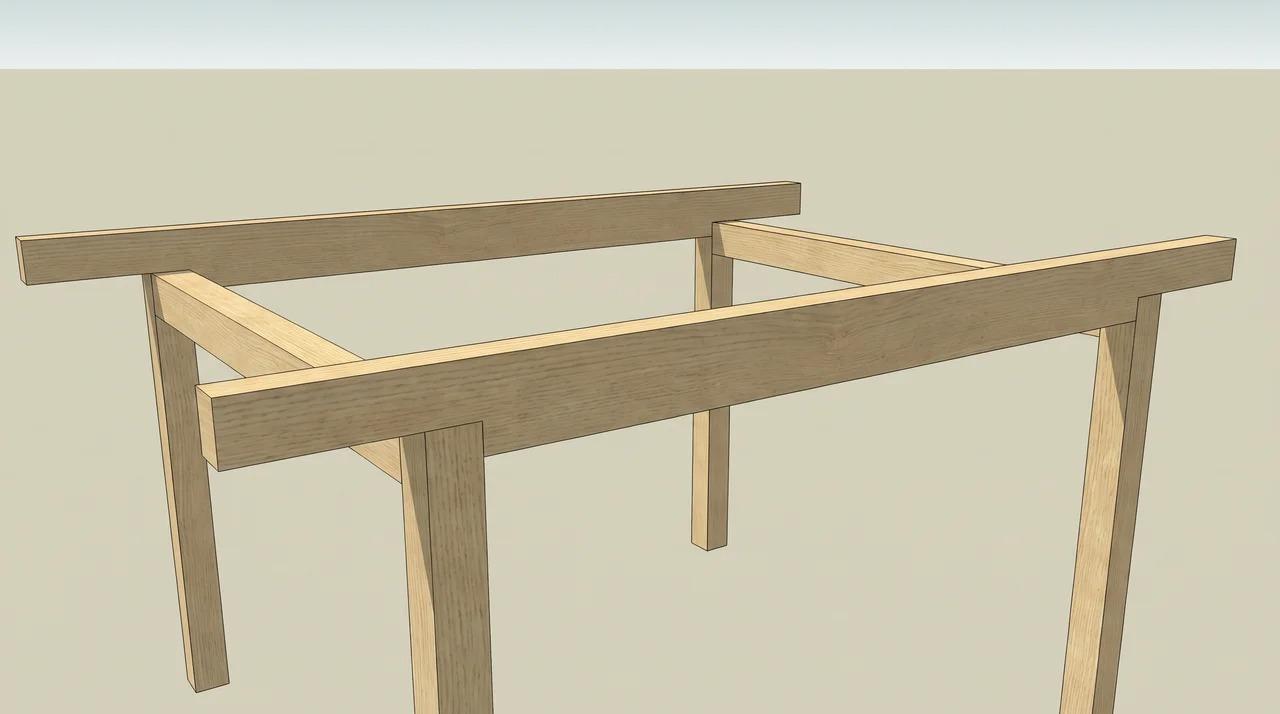
Lift each beam onto the tops of the posts with a helper. Let each beam overhang the end posts by 6-8 inches, since these visible overhangs are a signature detail of Japanese timber construction. Check that both beams are level and square to each other.
Secure each beam with post-cap ties or with structural screws driven at an angle into the post. To respect the "minimal hardware" rule, use black-coated hardware or hide the fasteners in plugged holes.
Step 6: Add the Rafters
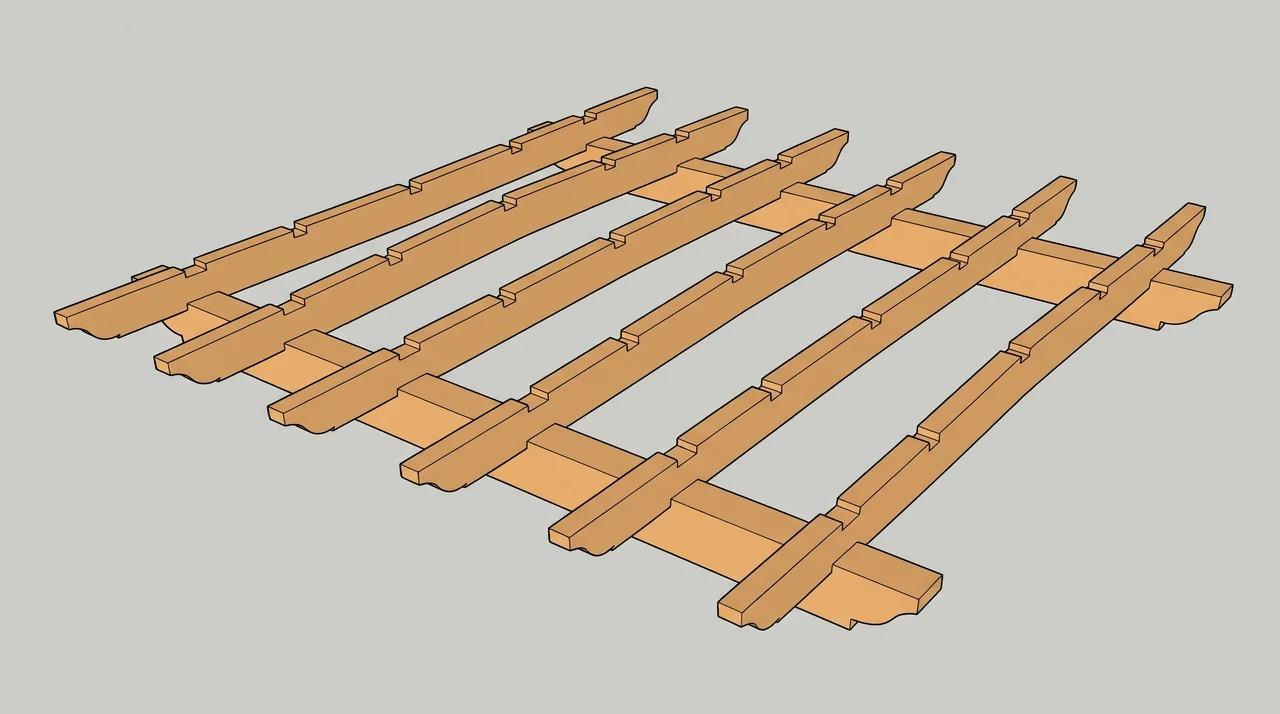
Rafters run across the beams, perpendicular to them.
- Space them evenly, roughly 16-24 inches apart. Wider spacing keeps the frame light. The slats on top will provide the fine pattern.
- Cut a shallow notch (about 1/2 inch) in the underside of each rafter so it sits snugly on the beam. Don't notch the beam itself, because that weakens it.
- Fix each rafter with rafter ties or angled structural screws.
- Let the rafters overhang the beams by 10-12 inches.
- Shape the overhanging ends. A simple angled cut works, and a gentle upward curve, marked with a template and cut with a jigsaw, gives the classic look.
Keep the frame plain and put this detail on the rafter ends only. A curved end looks elegant on a plain frame and fussy on a busy one.
Step 7: Add the Top Slats
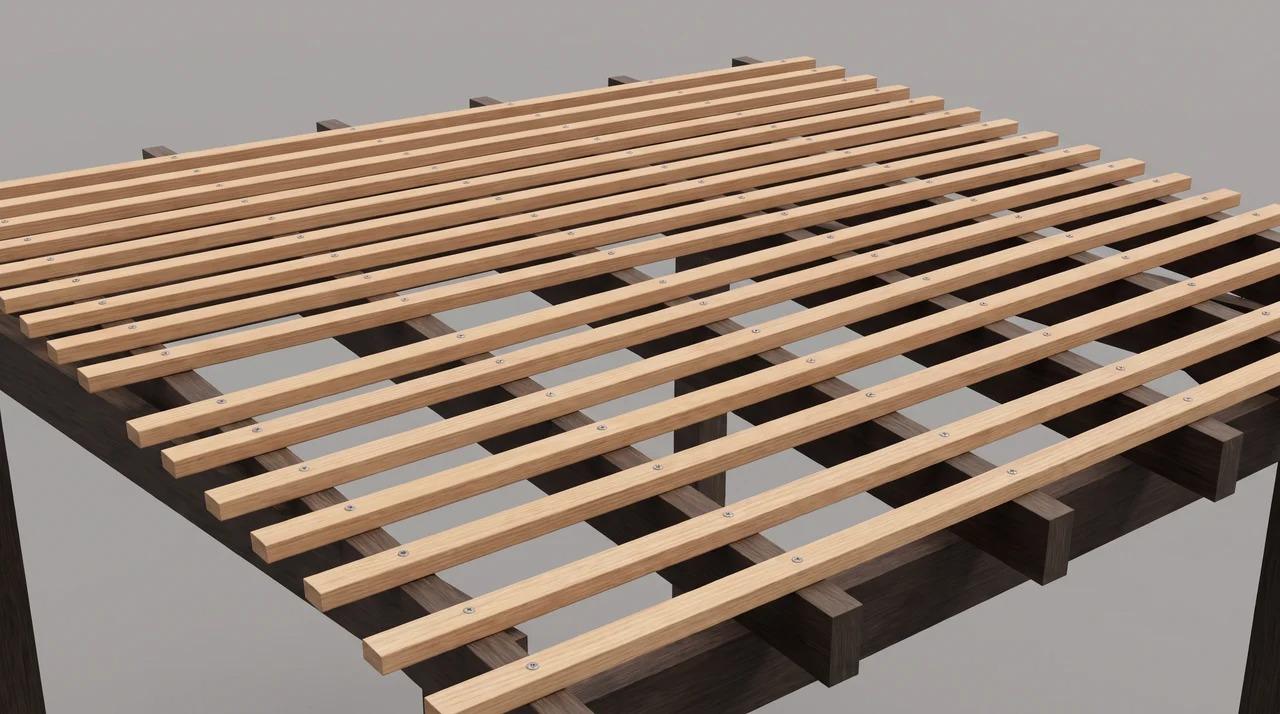
Lay the 2×2 slats across the rafters at right angles, about 6-8 inches apart, and screw them down from above. This is where the fine shadow pattern comes from. Slim members keep the visual weight light.
If you want more shade, add bamboo poles or slats instead. Bamboo slats filter light but will not keep out rain, so they won't work as a waterproof roof.
Step 8: Touch Up and Add Finishing Touches
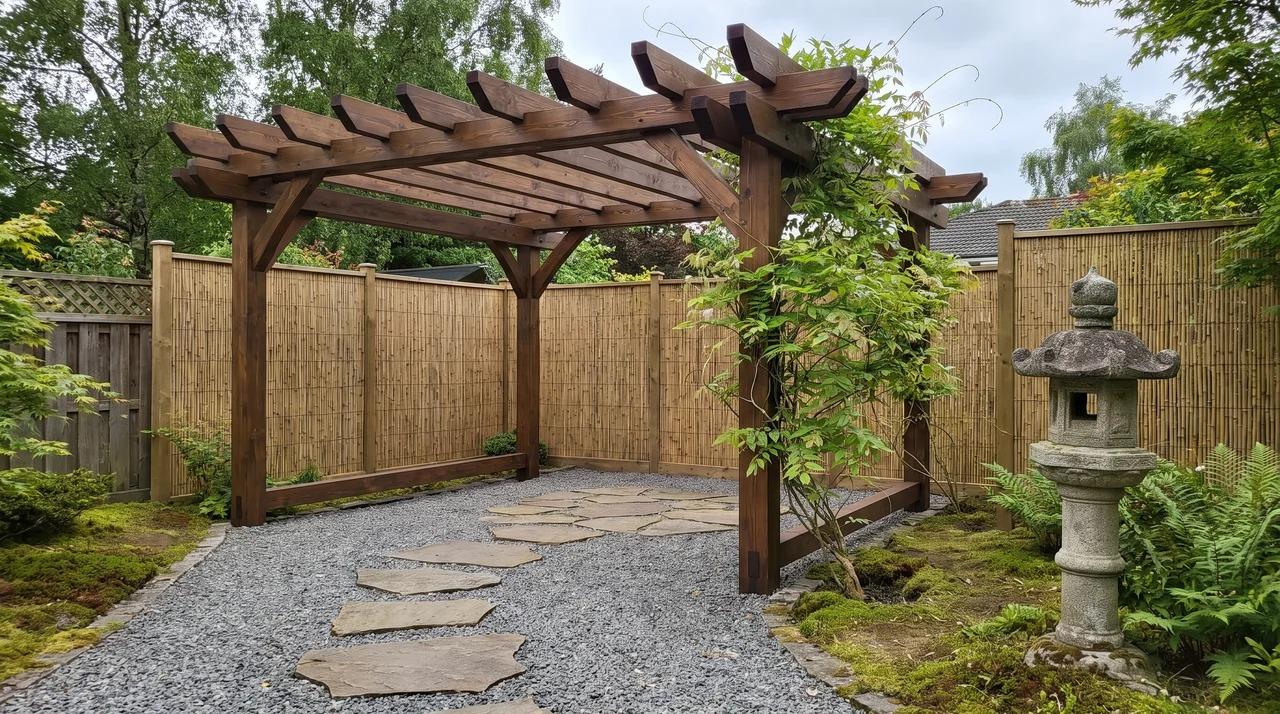
Sand and seal any cut ends or scratches made during assembly. Then add a few carefully chosen elements:
- A gravel path or stepping stones leading to the structure.
- One stone lantern or outdoor-rated (or solar) light. A single lantern suits the restrained style better than one at each corner.
- A bamboo screen on one side for privacy.
- A climbing plant. Ivy is light and easy.If you choose wisteria, note that a mature vine is very heavy, so confirm that your posts and beams are sized for its full-grown weight.
Step back and look at the whole space. If anything feels crowded, remove it.
Common Mistakes to Avoid When Building a Japanese Pergola
Knowing what can go wrong helps you avoid it. These are the most common mistakes DIYers make.
- Building in a spot with poor drainage or harsh afternoon sun makes the space uncomfortable. Walk around your yard at different times of day before locking in a location.
- Posts that are not anchored in solid concrete will shift over time, causing beams to go out of level and joints to loosen. Always use proper footings, even if it adds a day to your timeline.
- Cheap lumber saves money upfront but leads to costly repairs within a few years. Use quality wood and the right hardware from the beginning to avoid problems down the road.
- Unevenly spaced rafters or posts that are not perfectly plumb are very difficult to correct once the structure is built. Check and recheck your measurements and levels at every stage.
- Too many decorative accessories make a Japanese pergola feel cluttered and lose its character. Choose two or three key elements and leave it at that. Simplicity is what makes this style work.
How to Maintain a Japanese Pergola
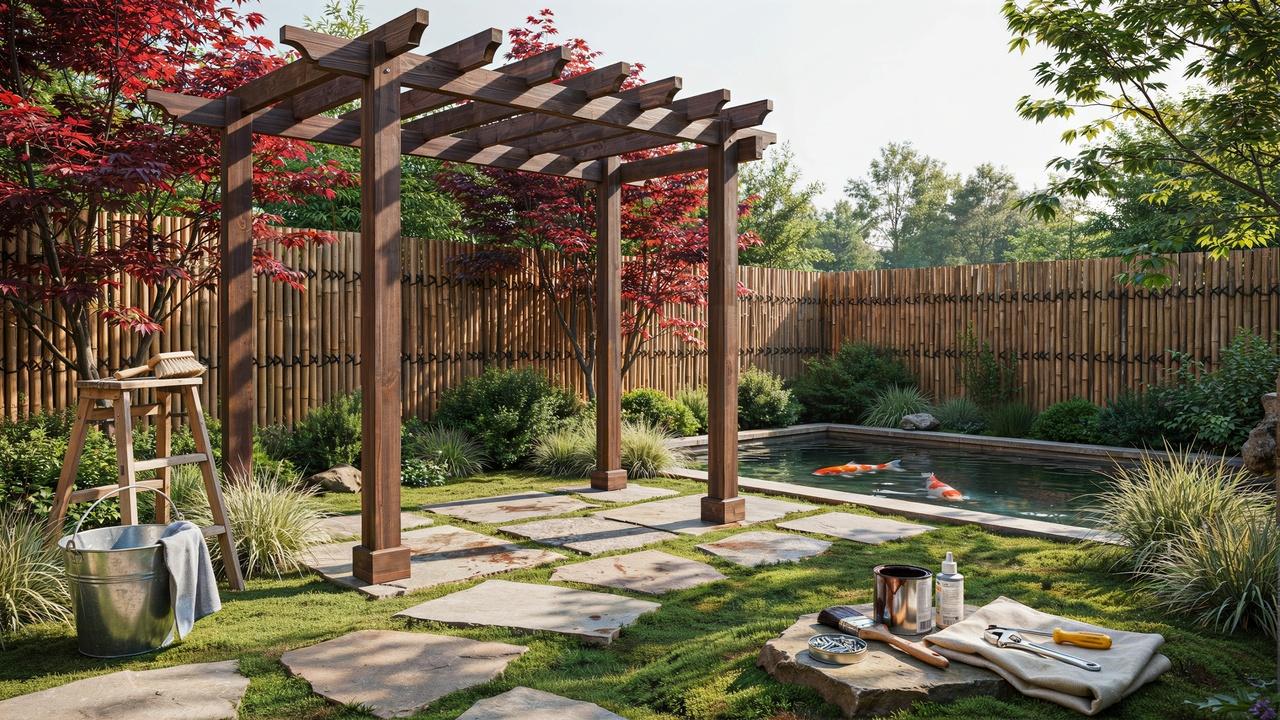
A well-maintained Japanese pergola can last for decades, but it does need regular attention to stay in good shape.
Sweep off leaves and debris often, and wash the wood with a garden hose and soft brush once or twice a year.
Avoid pressure washing as it strips stain and damages the grain. Clear out leaves from the lattice sections every fall since trapped moisture speeds up decay.
Apply a fresh coat of exterior sealant every one to two years, and add a waterproof cover in wet climates.
Check every joint, screw, and bolt annually, and replace any corroded hardware right away.
If the stain fades or bare wood appears, lightly sand the spot and reapply stain and sealant to keep the structure protected and looking its best.
Design Tips to Create an Authentic Japanese Pergola
- Choose two or three key elements. A lantern, a bamboo screen, and one climbing plant are enough. More than that clutters the space.
- Keep the frame plain. Save any special detail, such as curved rafter ends, for one feature only.
- Let the wood age. A natural finish or light stain lets the pergola weather gracefully instead of fighting it.
- Pair it with stone and gravel. Stepping stones, gravel paths, and a stone lantern anchor the structure in the landscape.
- Frame a view. Place it so it draws the eye toward something, such as a tree, a water feature, or a garden bench.
Wisteria is the classic climbing plant for this style, but a mature vine is very heavy. If you plan to grow it, size your posts and beams for the plant's full-grown weight, not for how it looks when first planted. Lighter climbers like ivy soften the frame with far less strain.
Conclusion
Building a Japanese pergola is one of the most rewarding outdoor projects you can take on. You get a functional shade structure and a peaceful outdoor space that reflects a timeless design style.
Plan carefully, use quality materials, follow the steps in order, and pay attention to the small details that make the design feel genuine. A well-built Japanese pergola can last for decades with the right care.
If this guide helped you, share it with someone who's planning their own outdoor project, or drop a comment below with your questions.
Frequently Asked Questions
What is a Japanese gazebo called?
A Japanese garden gazebo is called an azumaya. It is a small open-sided pavilion with a solid roof, built for resting and viewing the garden. A pergola differs because its overhead is open slats rather than a roof, so an azumaya gives shelter while a Japanese pergola gives filtered light.
What is the difference between a pagoda and a pergola?
A pergola is an open frame of posts, beams, and rafters that filters light and supports climbing plants. A pagoda is a tiered, multi-roofed tower with religious origins, and a garden pagoda gives full cover. Japanese pergolas borrow curved rafter ends from traditional temple architecture but stay open and single-level.
Which wood suits a Japanese pergola?
Cedar is the usual choice because it resists rot and weathers to a soft grey without heavy treatment. Bamboo suits lighter, more rustic structures but needs replacing sooner outdoors. Choose a straight-grained, lightly finished timber, since the look depends on visible grain and natural ageing rather than paint or ornament.
Which plants suit a Japanese pergola?
Wisteria is the classic choice, and Japanese gardens have long trained it over trellised frames so its flower clusters hang through the rafters. Ivy or other climbers can soften the frame year-round. Choose a vigorous climber only if the posts and beams are sized to carry its weight as it matures.